
Template Installation & Configuration
The Netwealth Insights Template App is an approved Power BI app that supports the Microsoft Power BI web application. This guide walks you through the web application user interface to configure the Power BI reports of your practice.
Before starting the installation, please ensure that you meet the following prerequisites for data to flow smoothly into the Netwealth Insights reports.
Prerequisites
- A Microsoft Power BI Pro license.
- Logged into your Microsoft Power BI Pro account: Power BI Login
- Good familiarity with the basic concepts of Power BI.
Overview
The below steps take you through how to install and configure your Netwealth Practice Insights reports through Power Bi using an app.
Once you have installed and configured Netwealth Practice Insights on your computer, why not take advantage of the mobile capabilities to stay informed on the go. To find out more, see Power BI for Mobile.
Installation
To install the Netwealth Insights Template App from the app store:
- Login into Microsoft Power BI Pro and click on the Apps section in the left hand menu.
- Click on the Get Apps button in the top right corner of the screen
- Search for Netwealth Insights in the app store.
- Click on the Netwealth Practice Insights App and then click on the Get It Now button. You may need to provide some basic profile information to proceed to installation.
- Once installed and the app is opened, click on the Connect your data option at the top of the page.

- Change the Practice parameter to your xeppo domain name. Your domain name would be as per the bold text in this example: https://portal.xeppo.com.au/yourpractice/home. Other parameters can remain unchanged by default.
- Click the Next button.
- Enter in your Xeppo username and password, ensuring the connection type is Basic and the Privacy level is Private.
- If you are installing the build for the first time, Microsoft Power BI notifies you when the app is ready.
- If you have an existing template app, Power BI prompts you to either install on a new workspace or replace the existing template app. Replacing the template app is recommended if you have existing issues with the report.
To get back to the main menu at any time, click on Power BI in the top left of the page.

Configuration: Datasets and Workflows
A more advanced option is to use the datasets and workflows page. When first installing, you should review and configure the settings below as a minimum. This may also be relevant for troubleshooting at a later point in time.
- Instead of clicking on the Go to app button after installation, click on the Workspaces in the main menu on left.
- Then, click on the newly installed template app that you wish to configure. Microsoft Power BI displays all the contents of the template app.
- Click on the Datasets + Dataflows page to navigate to the dataset entry.
- Click on the three dots next to the Netwealth Insights dataset. You will need to hover over area for the dots to display. Click then select Settings from the drop down menu.

- You should be taken to the Datasets section of the template app settings. If not, select the Datasets tab as shown below. From here, you will be able to review and configure your settings.

Alternatively, you can click on the Cog icon, click on the Settings menu and click on the Datasets tab. Either way brings you to the Datasets tab which you need to set up.
Data Source Credentials
The Xeppo Insights Report Template App uses the Open Data Protocol (or ODATA) to access information over the web. The protocol adheres to strict security measures. Select Edit Credentials to authenticate with your Xeppo login. You will need to come back here if you change your password in the future or your login is required to be authenticated again for other reasons.
Use the authentication settings below during the process:

Parameters
The parameters allow you to customise how the report works specifically for your practice. See below on locating the detail to enter for Practice and Report Contact Type Preference.

Practice:
Since you want to use the data of your practice, the Practice field should point to your xeppo sub-domain. You can find the sub-domain of your practice via the Xeppo Portal URL, e.g. https://portal.xeppo.com.au/yourpractice/home. Enter the value into the Practice field and click on the Apply button.
Report Type Contact Preference:
This is the Xeppo Key Firm Contact Type you wish the report to use for report grouping. The default is Client Adviser but change this field to whatever valid Key Firm Contact Type you preference in your Xeppo instance.
Scheduled Refreshes
Click on the Keep your data up to date setting to set up an automated refresh. We recommend creating a Refresh Plan.
Expand the Scheduled refresh menu item and set up the Refresh frequency, Time zone and Time to keep your dataset up-to-date. As an example, we set the refresh plan to start at 7 AM Daily based on the (UTC +9:30) Adelaide time zone.
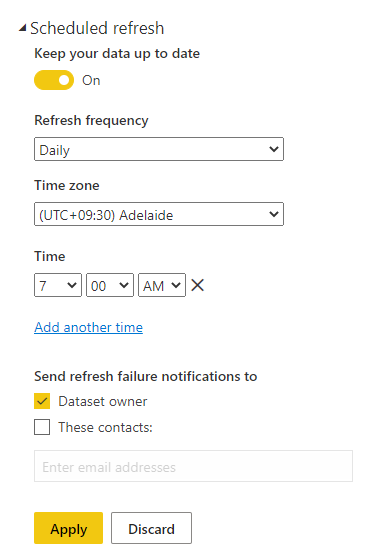
You can also enable email notifications to be sent to the data owner and include others whenever there is a data refresh failure. Click Apply.
- By default, the refresh happens at midnight each night. This may be too soon depending on when your data is refreshed in xeppo. This option allows you to add or change refresh timing.
- You can configure up to eight daily time slots if your dataset is on shared capacity or 48-time slots on Power BI Premium.
- After two months of inactivity, the scheduled refresh on your dataset is paused. A dataset is considered inactive when no user has visited any dashboard or report built on the dataset. At that time, the dataset owner is sent an email indicating the scheduled refresh is paused, and the refresh schedule for the dataset is displayed as disabled.
Manual Refresh
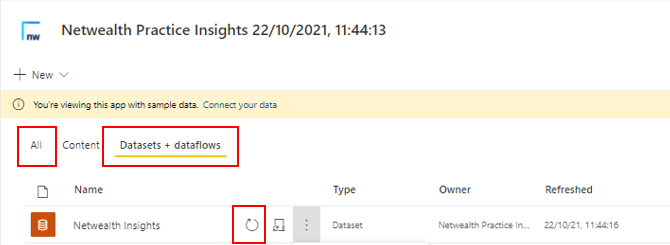
You can force a manual refresh in Power BI by clicking on the Refresh now icon. This is an optional method to check if the configuration of your dataset fields works as expected. You can access this by selecting Workspaces from the main menu on the left, then selecting Netwealth Practice Insights. Click on the refresh icon next to the dataset from either the All or Datasets + dataflows tab.
Refresh History
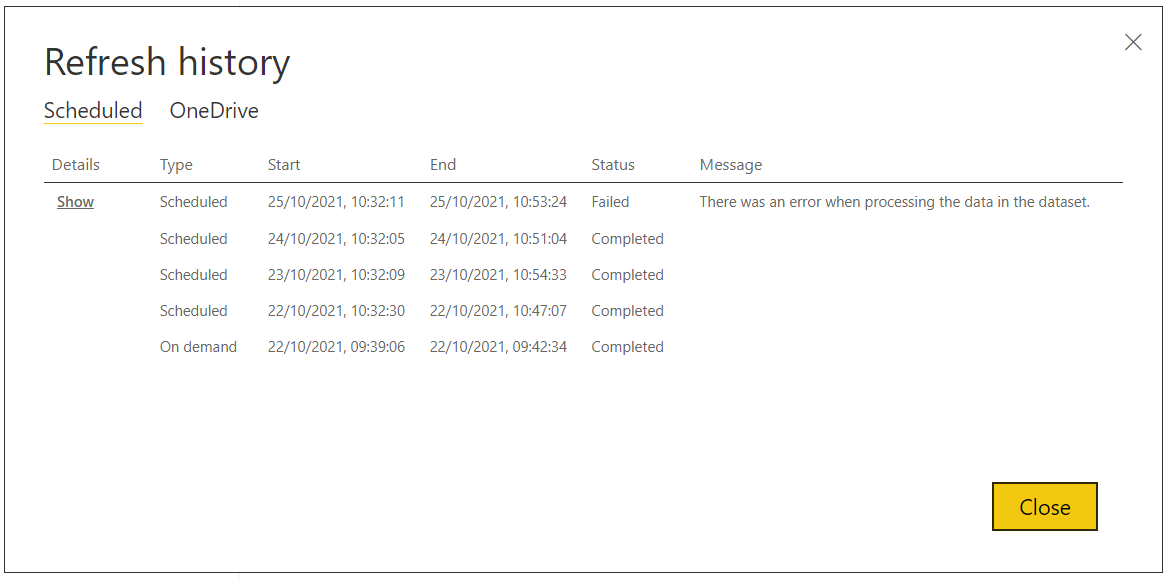
The Refresh History is an important part of understanding how a data flow is performing. Every refresh will show when it happened, how long it took and if it completed or failed. You can view the refresh history from the Datasets settings page and click on Refresh History
Additional References
Firstly, remember you can keep up to date when on the go with Power BI for mobile. Set up only takes a minute then you will have valuable insights at your fingertips, where ever you may be. advantage of the mobile capabilities to stay informed on the go. To find out more, see Power BI for Mobile.
We have added links to articles from the Microsoft® Knowledgebase that helps in your journey with Power BI. We encourage you to read for additional knowledge.
Comments
Article is closed for comments.