Managing Income & Expenses against Clients

Income & Expenses Overview
Practices are now able to add and manage Income and Expense details against clients where the detail is not ingested into Xeppo from a source system. This article contains information on the initial setup required, creating and managing income and expenses.
Use the links on the right hand side to navigate through various topics in this article to easily find what you’re after.
Important Considerations
Please make sure to consider the follow points relating to adding and managing Income and Expenses:
- Before these details are able to be added, your Practice Admin will need to configure the Cashflow Lookup Fields in the Admin > Settings menu.
- Income and expenses can only be added against a client not against a group. Multiple Clients can be selected as the Owners where they share the income or expense.
- When created in Xeppo, income and expense data will not sync back to your source system(s). Details will only be available through your Xeppo portal at this stage but this may change in the future.
- You cannot edit Income or Expenses ingested into Xeppo from a source system. This can only be actioned in the source system, however this may change in the future.
Admin Setting Configurations
Before an income or expense can be added against a client, settings must first be configured. This configuration can only by actioned by a Practice Admin user. Steps are below to help guide you on the setup process. From the top menu select Admin > Settings > Cashflow Lookup Fields. From here you will be able to configure settings to align with the requirements of your practice.
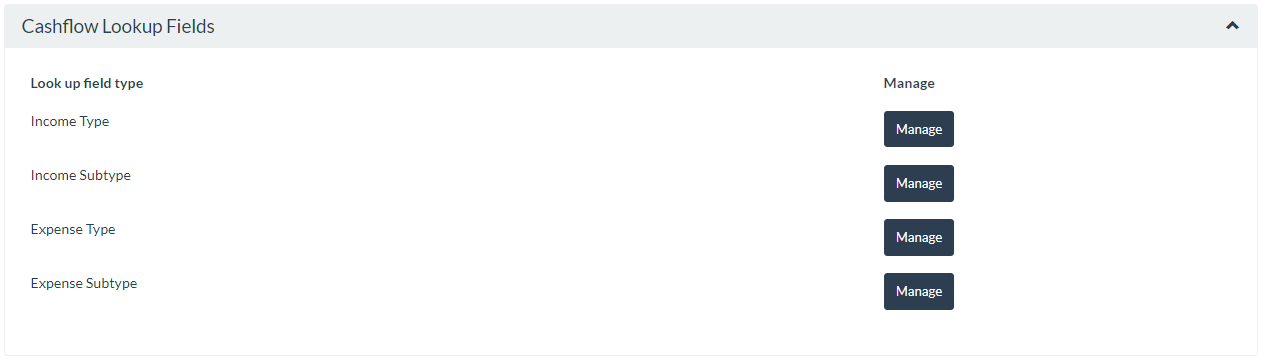
Guide to configuring Admin Settings > Cashflow Lookup Fields
| Lookup Field | Configuration |
|---|---|
| Income Type | Select Manage to add, edit or delete Income Types. These options will become available via a dropdown when adding Income against a Client. Income and and Other Income will be shown in this section of the settings by default, but edits can be made to reflect the way you wish to capture data for your Clients within Xeppo. |
| Income Subtype | Once the Income Type settings have been completed, you can add your Income Subtypes within. These are mandatory fields when adding Income details against a Client and will become available within the dropdown menu when income is added or edited in Cashflow. As an example, you may have an Income Type of Income, with Subtypes of Employment, Pension, Dividends, Business, Rental, etc. |
| Expense Type | Select Manage to add, edit or delete Expense Types. These options will become available via a dropdown when adding an Expense against a Client. For example, you may have Expense Types of Living Expenses, Debt, Contributions, etc. |
| Expense Subtype | Once the Expense Type settings have been completed, you can add your Expense Subtypes within. These are mandatory fields when adding Expense details against a Client. The options will become available within the dropdown menu when an expense is added or edited in Cashflow. As an example, you may have an Expense Type of Living Expenses, with Subtypes of Household, Utilities, Entertainment, Personal, etc. |
Locate Income and Expense Details
Locate the client or group record then within the record, select Details > Cashflow.
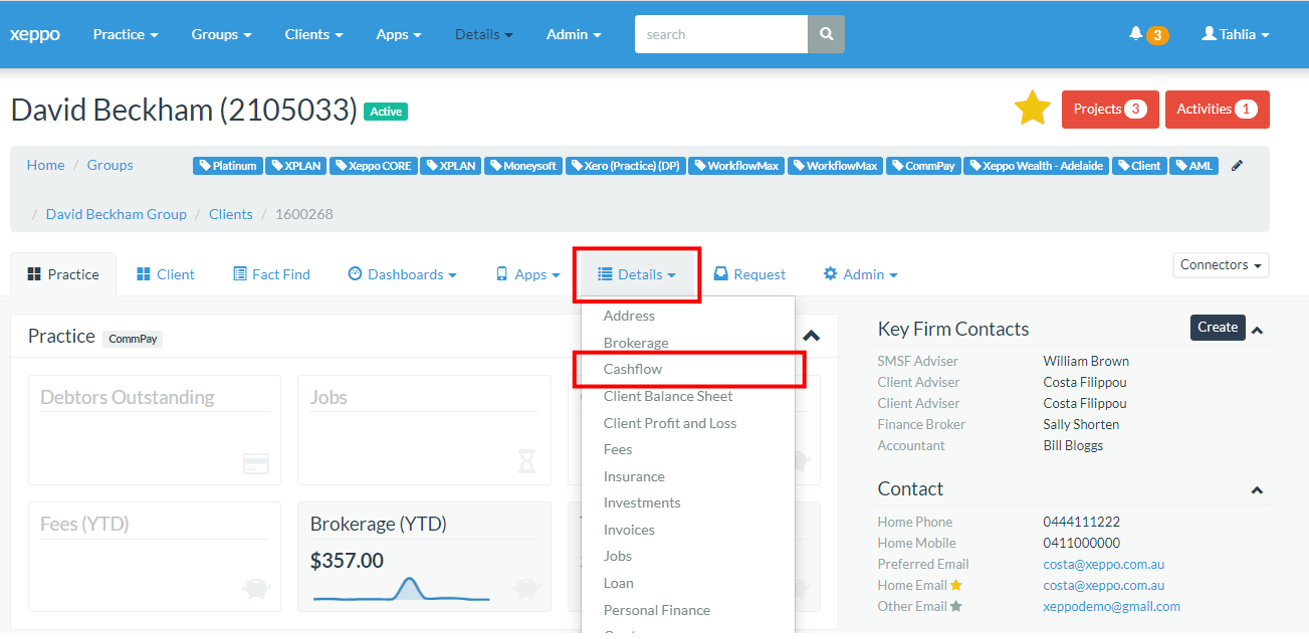
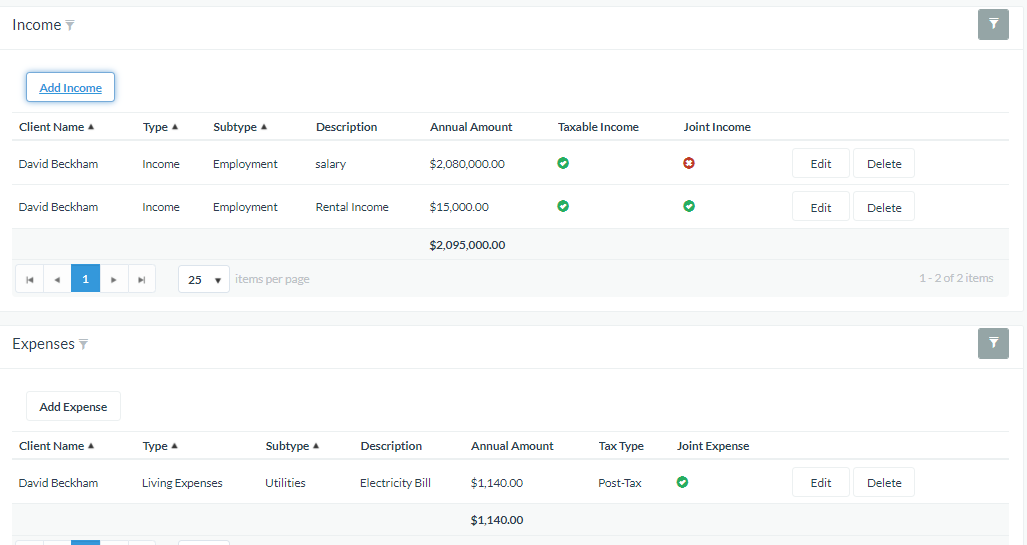
If accessing the Cashflow page from a Client record, the view will default to show a snapshot of the income and expenses for the Client only. The tiles and cashflow details will update depending on if you have a Client selected or the group. Below shows an example of the cashflow detail for a Client.
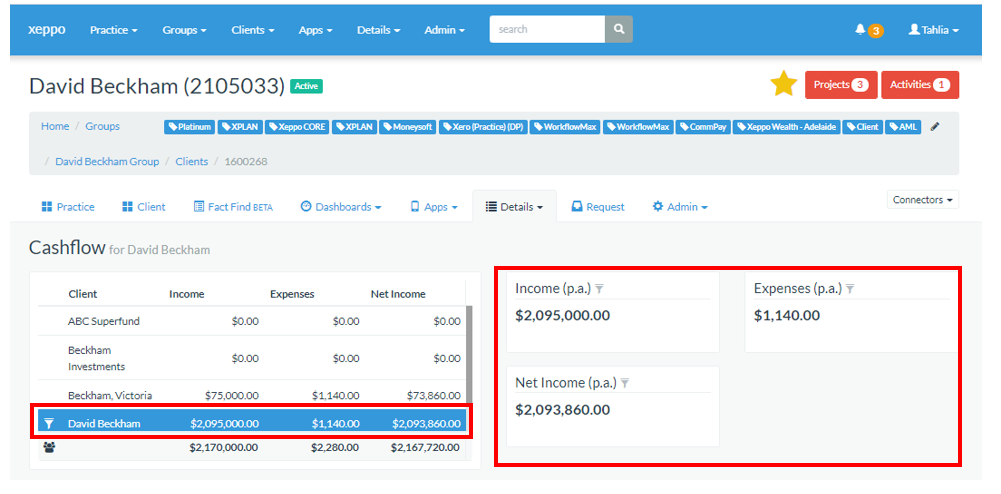
You can toggle between Clients, or show details for the whole Group by selecting the Group icon as shown. The tiles and cashflow details will update based on your current selection. Below shows an example of the cashflow detail for a Group.
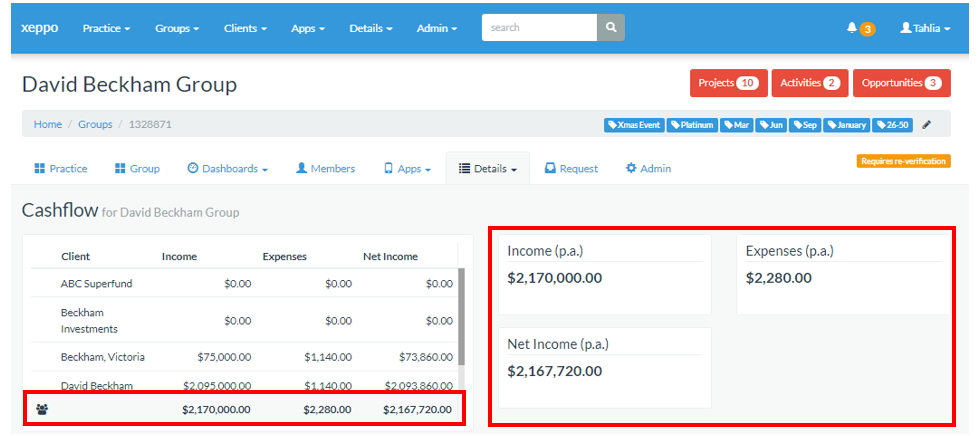
Information on the income and expenses is itemised further down the page and will also pivot based on your client or group selection, including if it is a joint income/expense or solely owned by the client. Where an income or expense is joint, the amount displayed is indicative of the client's share.
Create Income detail against a Client
From within the Cashflow section of the client record, click Add Income. This will pop up the Income window as per below. Note that an Income must be added against a client(s), although the detail will be visible under the group once created, along with Income details from other members of the group.
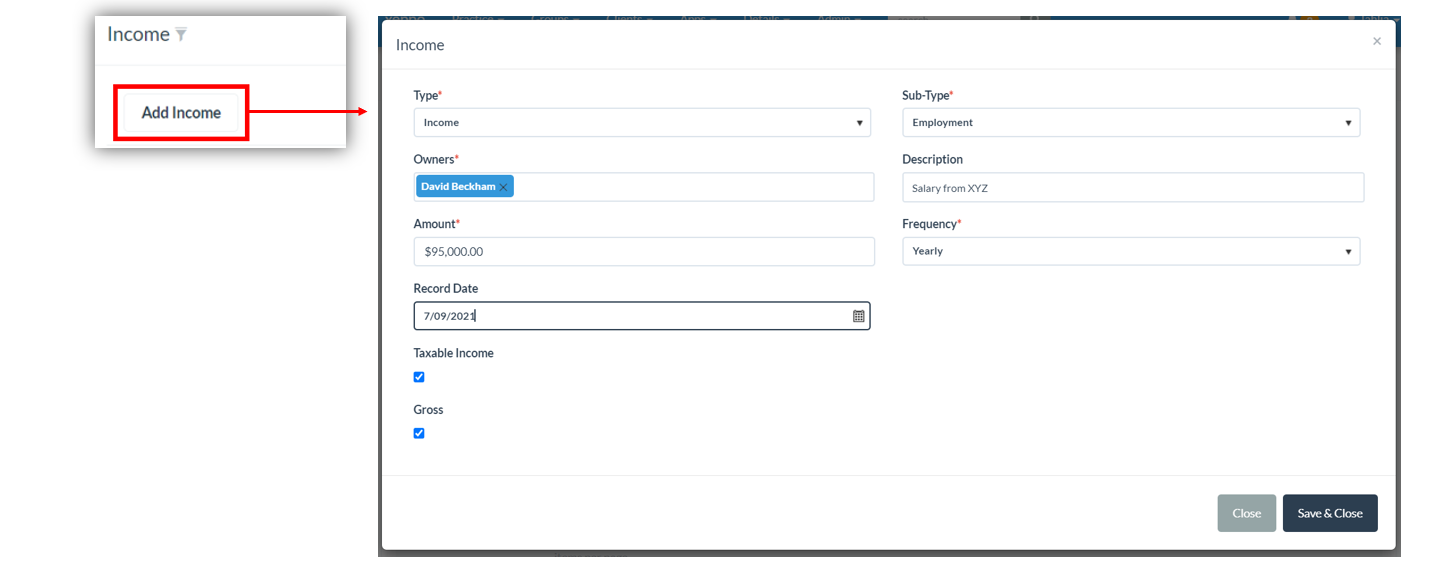
Complete each section, noting that any fields marked with an asterisk (*) are mandatory and must be completed. Once you have entered the required information, click the Save & Close button at the bottom of the window.
Guide to completing Income details
| Field(s) | Detail |
|---|---|
| Type & Subtype* | The options available are determined by your configurations in Admin > Settings > Cashflow Lookup Fields. If the options you require are not available please speak to your practice admin. |
| Owners* | If you are in a client's record and Add Income, the client will be displayed here by default. If the income is joint income shared between multiple clients, you can have more than one owner. The income recorded will be apportioned equally between the owners. |
| Description | Free text field to enter a description associated with the income. For example, the name of an employer. |
| Amount* | The total of the income received relevant to the frequency. If there are multiple owners, enter the total for all owners combined. Xeppo will then apportion it equally to the Clients recorded as owners. |
| Frequency* | How often the amount is paid. Options available are Weekly, Fortnightly, Monthly, Quarterly, Half Yearly, Yearly and Once-off. |
| Record Date | The date that information was provided by the client / correct as of date. |
| Taxable Income* | Indicates if the income is or is not taxable. The check box will be enabled by default. If the income is not taxable, uncheck the box. |
| Gross* | Indicates if the income amount is the Gross amount. The check box will be enabled by default. If the income is Net, uncheck the box. |
Create Expense detail against a Client
From within the Cashflow section of the client record, click Add Expense. This will pop up the Expense window as per below. Note that an expense must be added against a client(s), although the detail will be visible under the group once created, along with expense details from other members of the group.
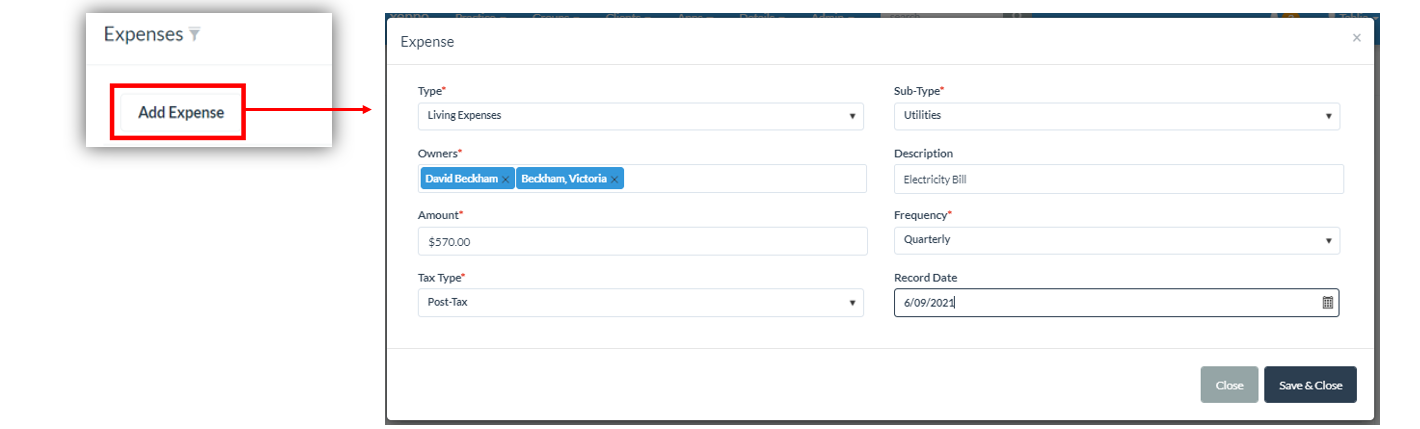
Complete each section, noting that any fields marked with an asterisk (*) are mandatory and must be completed. Once you have entered the required information, click the Save & Close button at the bottom of the window.
Guide to completing Expense details
| Field(s) | Detail |
|---|---|
| Type & Subtype* | The options available are determined by your configurations in Admin > Settings > Cashflow Lookup Fields. If the options you require are not available please speak to your practice admin. |
| Owners* | If you are in a client's record and Add Expense, the client will be displayed here by default. If the expense is a joint expense shared between multiple clients, you can have more than one owner. The expense amount recorded will be apportioned equally between the owners. |
| Description | Free text field to enter a description associated with the expense. |
| Amount* | The total of the expense relevant to the frequency. If there are multiple owners, enter the total for all owners combined. Xeppo will then apportion it equally to the Clients recorded as owners. |
| Frequency* | How often the amount is paid. Options available are Weekly, Fortnightly, Monthly, Quarterly, Half Yearly, Yearly and Once-off. |
| Tax Type* | Indicates if the expense is paid Post-Tax or Pre-Tax. |
| Record Date | The date that information was provided by the client / correct as of date. |
Manage Existing Income and Expenses
From within the Cashflow section of a client or group record, you can edit or delete Income and Expenses that were created in Xeppo.
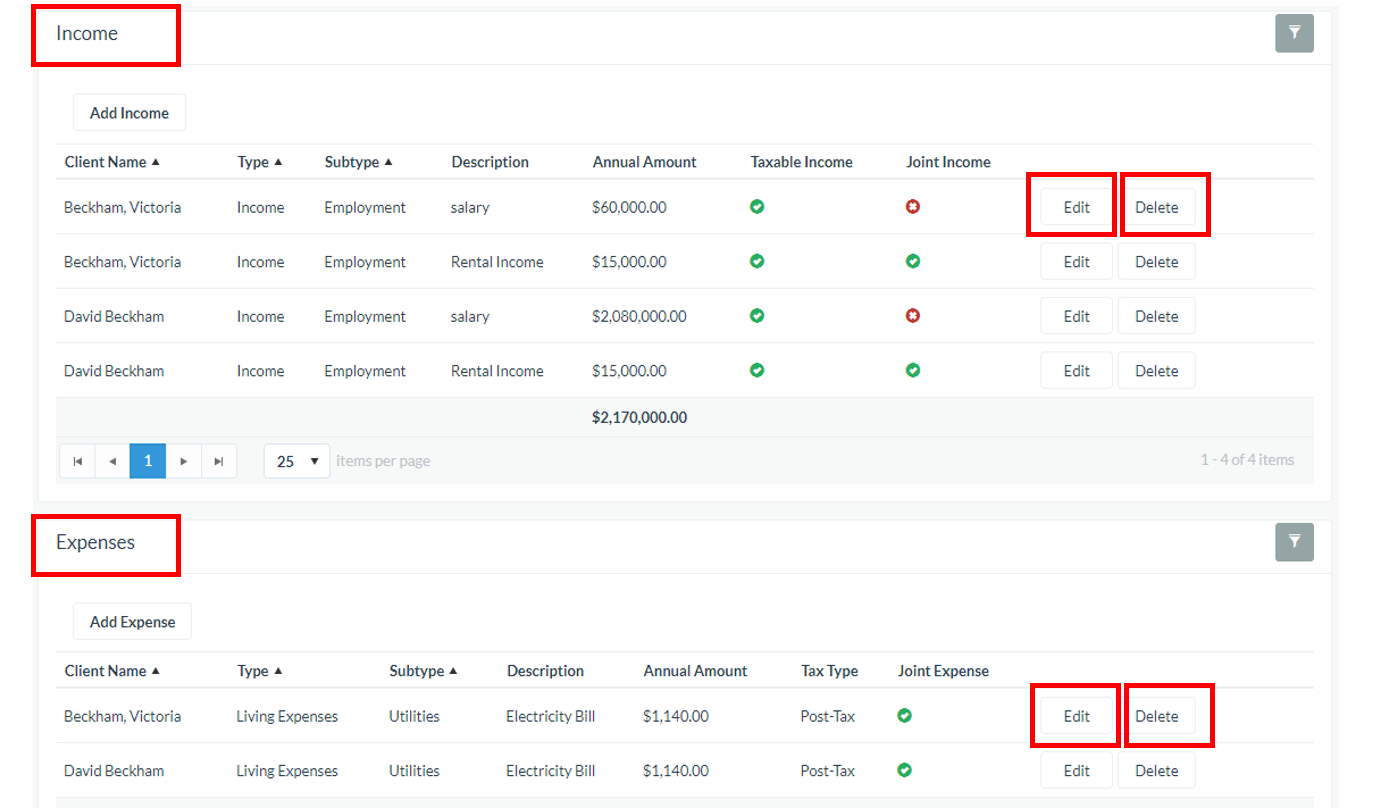
Edit: This function allows you to make to updates to an Income or Expense that was created in Xeppo
Delete: Use this function to delete records that are no longer required or have been duplicated.
The edit and delete functions are only applicable to Income and Expenses created in Xeppo. If these options do not display it means the data for the policy is coming from a source system. Any changes required can only be actioned in the source system.
Comments
Article is closed for comments.